Wednesday, March 30, 2011

Art vs. Home Decor?

        Here's an interesting question:
        Tamper will sell fashion, accessories and home decor because I like to make a wide variety of things. I know that a business should be fairly focused though, so what should I sell under the Tamper name and what should I show, sell or market elsewhere?
        I'm thinking that the answer may lay in the distinction between "art" and "home decor". As in Tamper will sell home decor and I'll leave the art for another project. I'm sure I'll gain some insight as I do more business planning and research but if any of you have thoughts on the subject, I'd love to read them.
        In the mean time here are some carvings I made. I hope you think they're pretty and if you're an art geek like me you can also ponder whether they are "art" or "home decor" ;p

Wednesday, March 23, 2011

Self Employment Benefits (SEB) Program Application... (due tomorrow!)

Hello Blog-o-shere,
        It's been quite a week for me. The SEB (Self Employment Benefits) Orientation was last Thursday and it was really informative. Got me pretty excited about applying. There were about twenty people there and I sat with some fun folks - two of them were NSCAD alum like me. The program gives us all a week to come up with a very basic business plan. I go back to the CEED (Center for Entrepreneur Education and Development) office tomorrow to hand it in and give a little interview. CEED will let me know in two weeks whether I'm in or not. There aren't a limited number of spaces so that gives me a good feeling about my chances of acceptance. Also if I don't make it they'll tell me why so I can fix whatever the problem is and apply again in three months. So that seems pretty fair.
        I do have some fun things that I'm making right now, but since this week has been all about the business plan for me I thought I would post some (of the less boring bits) of that.
        First of all, I did a display page of images to hand in with the business plan to give some sense of the products I plan to sell. These have already appeared on the blog but this time I tried to make them look like part of a scrap book:

        Also, I had mentioned in another post that I wanted to post a time line of my goals for the business. Well I put that together for the business plan and here it is:

        Both of those pictures are too small to see the writing but if you click on them they should open in a new window large enough to read. Let me know if that's not happening.      
        I have to run because I still have some work to do for my meeting tomorrow. Enjoy the beautiful weather until then.

Wednesday, March 16, 2011

Love to Japan, Leg Warmers, Button Tank, and Free Commenting

        Before I write my entry for this week I'd like to take a moment to offer some thoughts to friends and family who were in Japan during the recent string of disasters. I hope the worst is over and I wish you all the best in picking up and carrying on or in moving away. I also hope that you have the time and peace of mind to make that difficult decision. Personally I have been avoiding so many memories of Fukushima. It's all too shocking.


       Back here in Nova Scotia we're having beautiful Spring weather so I took the opportunity to take some pictures outside this afternoon.
       Here are some organic cotton leg warmers:
        You can wear them slouchy or tie them to stay up with the adjustable ribbon at the top:
        This next picture doesn't give you any product information but I really couldn't resist posting it. It's my sister on a trampoline. I didn't mean to shoot up her skirt, but you can't see anything and it's super fun shot:
        The other thing I had a chance to photograph today is a simple tank top that buttons in the back. This one is a prototype so it's made of plain, undyed cotton - but I have some beautiful hemp summercloth out of which I'm planning to make the next ones.

        It turns out that I miscalculated the dates when I said I would have more information on the entrepreneurship program today. The orientation is tomorrow so next week I'll have the scoop on that. I know that I'll have to have a business plan ready for next week too so I'll post any interesting developments from that here as well.
        A friend of my brother tried to leave a comment this week only to find that commenting was restricted to people with a google account - thanks for letting me know about that. I've changed those preferences and now everyone should be able to comment to their heart's content. If that's not the case please let me know by emailing tamperling@gmail.com
        Much thanks this week to my beautiful model (and sister), Sophie Godsoe. Sophie's a talented artist as well as a model and has asked me to pass along her devientART screen name for those of you who'd like to check out her work on that site: iraisedherdifferent6.
        Here's hoping for a week with altogether less news than the last one. Until next time... Jaa ne

Wednesday, March 9, 2011

Picking Up Pace

        Well Lovelies, no photos today but I'm gonna cut myself a little slack because of all the running around I've been up to this week. The details are a bit tedious but the long and the short of it is that there is a forty week entrepreneurship course offered through the Centre for Entrepreneurship Education and Development (CEED) and I'm getting my ducks in a row to be eligible for that. It's exactly what I need to get the business skills and confidence to really pull this thing together. It's not for sure yet but I'll definitely keep you posted.
        If anybody is interested I found this course through the YMCA Employment Center in Dartmouth (118 Wyse Road near the bridge terminal). They hold orientations every Thursday at 2 and then you can set up a meeting with an employment counsellor and s/he can refer you to programs like the Self-Employment Benefits (SEB) program that I'm applying for. This particular program is only for people who've received EI sometime in the last three years and haven't registered a business yet. If that's not you though they may have something else for you. Can't hurt to look.
        This business and my life in general seem to be picking up pace. It feels good to be maintaining the regular amount of activity that I did before I got sick. It's been almost a year since I left my teaching job so it's about time. I've been so impatient to get well!
        Next week I'll have more news about the SEB program and at least one photo of something I make.

Wednesday, March 2, 2011

Recycled Table Cloth Button Wrap Skirt

        I love recycling clothing. It's all about improvising so even though I'm giving some instructions here I hope you're inspired to make this project your own.

You will need:
        a table cloth, curtain or sheet (a circle is best but square or rectangle will do)
        2 buttons
        a piece of newspaper
        a marker, pen or tailor's chalk
        scissors
        a straight edge
        thread
        a sewing machine (or mad skill)
        pins
        an iron (not in the instructions, but always makes sewing easier if you start by ironing)

Cut it out:

Step 1) If you have a rectangle make it into a square:
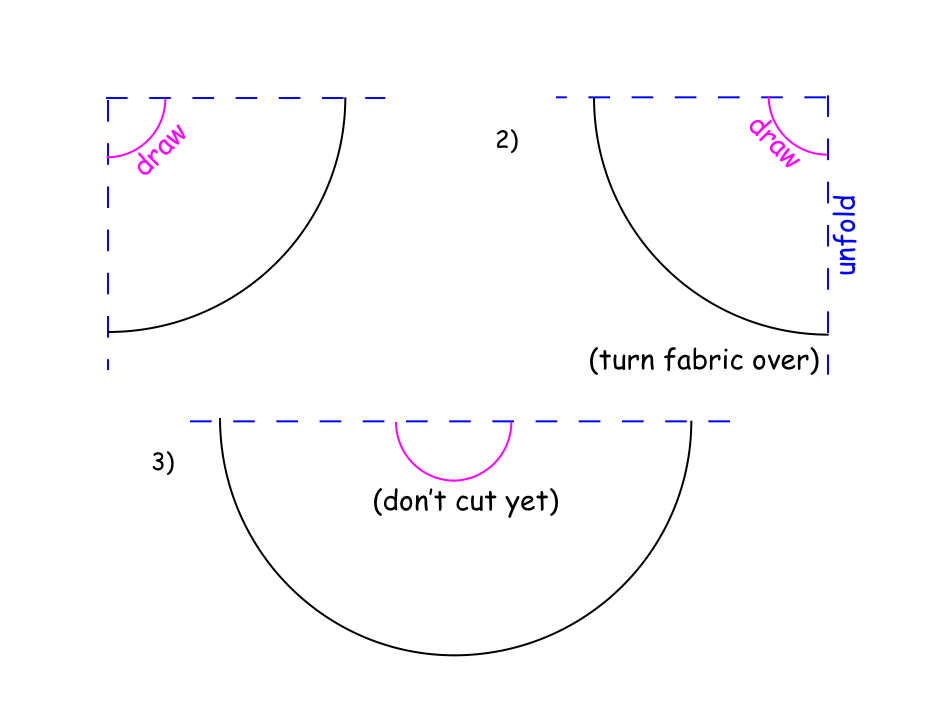
Step 2) If you have a square make it into a circle:


(You can draw the arc or measure it. To measure find the length of one side of the square and mark it on your straight edge. Then move your straight edge to make an angle with the apex at the corner where the folded sides meet. Make a mark on the fabric next to the mark on the straight edge. Make as many marks and angles as you need and then draw your arc through each of these marks)

Step 3) Leave the fabric folded in fourths. Draw a circle on a piece of newspaper that is larger than your hips - I traced a lazy susan, but you could also use a large bucket top or a pizza pan. Cut out the paper circle and fold it in fourths. Put the folded corner of the paper circle on the folded corner of the fabric and trace the paper arc onto the fabric. Keep the fabric folded and turn it over to trace the paper arc on the other side. Now unfold the fabric to make a half circle with a smaller half circle drawn on it (don't cut yet).

Step 4) Use your straight edge to draw a straight line parallel to the edge of the fabric. Start about two inches below the fold at the edge of the circle. Continue through the closest edge of the smaller drawn half circle and stop at the other side of the drawn half circle. Now cut out the long thin rectangle you have just made. Then cut out what's left of the smaller half circle making a moon shape.
Step 5) You might need extra length on your waistband and you can get some from the moon shape by unfolding the waistband and laying it along the straight side of the moon shape. Trace the width of the waistband and then cut it out. Use a square or the edge of a book to make the ends of the waist band pieces straight. Then sew each short piece on either end of the long piece and iron the seams open.

Sew it together:
If you've done a bit of sewing the rest is pretty straight forward so I'll make these instructions brief but if you have any questions leave a comment and I'll answer you.

1) Finish the straight edges of the skirt as you would a hem.

2) Match the center of the waistband to the center of the top of a skirt - right side of the waistband to wrong side of the skirt. Pin (if you like) and sew.

3) Leaving 3-4 inches of waistband extending at each side of the skirt cut the ends of the waistband at a 45 degree angle to avoid fabric bunching.

4) Fold the ends of the waistband to make it flush with the ends of the skirt then fold the band twice along its length to cover the unfinished side of the band and the seam that you've sewn already. The iron and some pins are handy for this step especially. Sew along the length of the waistband 2-5 mm above the fold.

5) Make a button hole at either end of the waistband parallel to the length of the waistband.

6) Wrap the skirt around your waist and pin it where you like the fit. Mark where your buttons will sit and sew them on, one facing out and one facing in. Sew on the buttons and you're done.

        Here's how mine turned out:

Because it's so adjustable I especially like the fit of the waist:


That was fun. I hope you liked it too.

        Right now I'm working on a meditation cushion, some felted slippers and a cat toy. Next week I'm going to try for pictures of two out of those three. I also have an entrepreneurship meeting this week at the local employment center and I'll fill you in on how that goes. Have a good week!